Upload Errors Report
Print
Modified on: Fri, 19 Jul, 2024 at 12:32 PM
Purpose and Benefits
The Upload Errors Report provides you with immediate feedback about the status of data uploaded to the CTC, GRID, LCSR and NMD registries submitted either through web-based transmission or via the file upload portal. Similar to the information available in the Data File Process Status Table, the report confirms whether a file was successfully uploaded (with or without warnings), rejected, or failed to load and displays details for efficient data correction and resubmission.
Note: The Upload Errors Report is especially helpful for viewing file upload status and error details across file uploads for multiple facilities in the same Corporate Account. It expedites identifying the facility specific uploads that require correction using the Data File Process Status Table (see the Data File Upload Instructions article for information about the Data File Process Table).
Example Use Cases
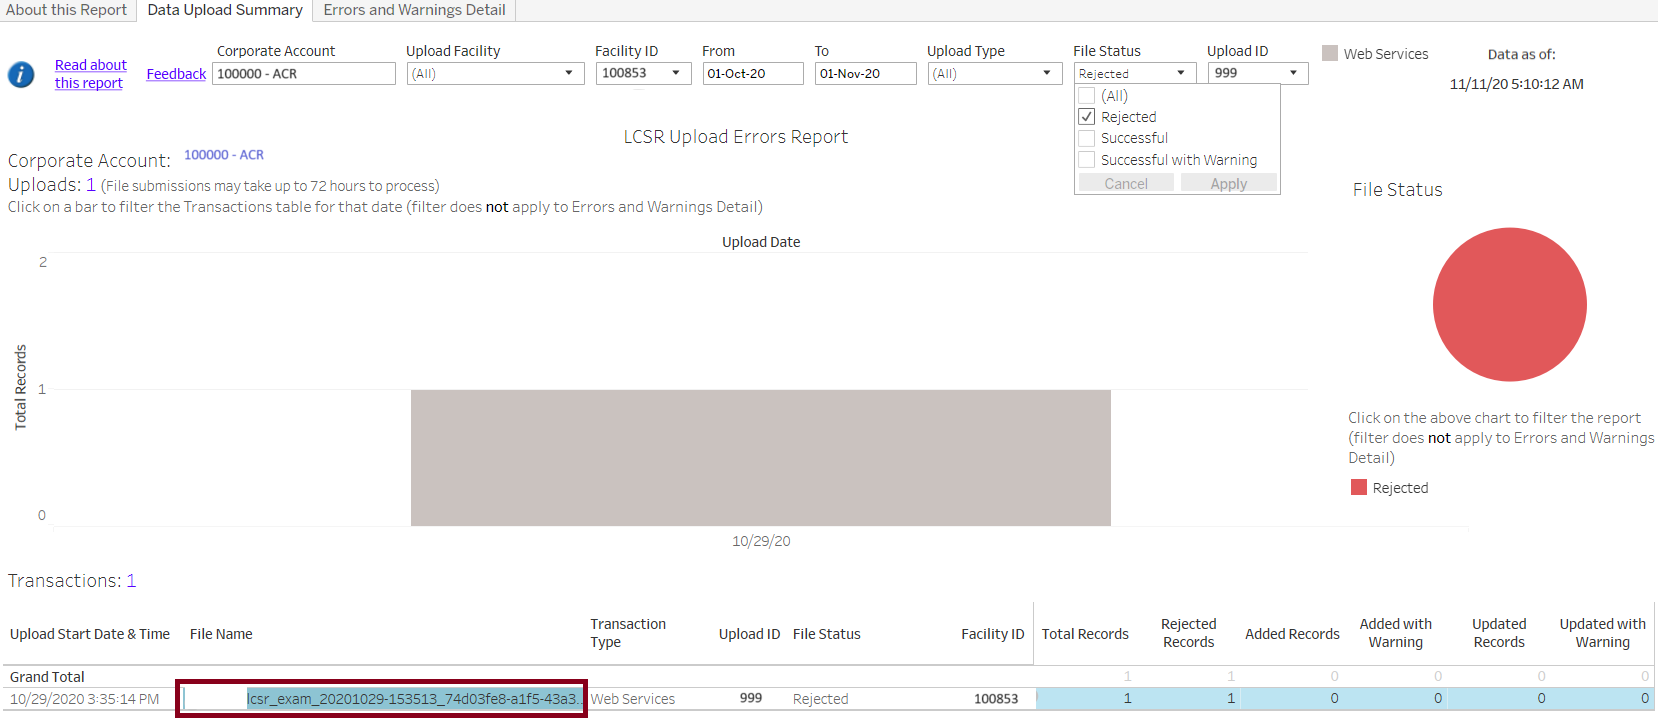
Example 1: A Corporate Account Administrator uploads Lung Cancer Screening Registry files for October 2020 for multiple facilities using Web-based data transmission. The next day, she checks the Upload Errors Report and sees that one file was rejected as shown in the screenshot below.

Click on the image to see a larger view.
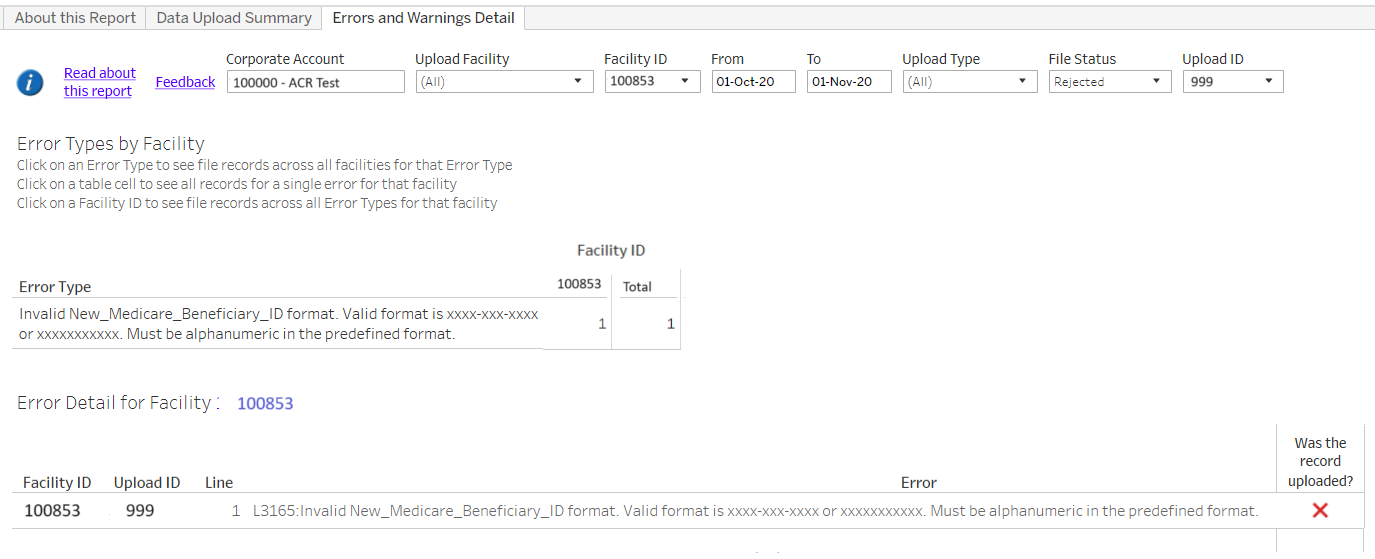
By selecting the rejected file, she can view the error details in the Errors and Warning Detail tab as shown in the screenshot below. This information will help her to quickly access the rejected file using the Data File Process Status Table, make corrections, and resubmit.

Click on the image to see a larger view.
Example 2: An NMD facility has recently installed a software upgrade and the Facility Administrator notices an increase in reject files and files with Successful with Warning notices. He is able to assess error patterns and meet with the software vendor to resolve the issues creating the errors.
How to Access
To access this report:
Under Quality Improvement Registries in the left menu, select either the CTC, GRID, LCSR, or NMD.
In the left menu under Operational Reports, click Upload Errors Report.
The report will open in a new window tab.

Report Features
Get started by selecting a Corporate Account, corresponding Facility, or Facilities, and a timeframe of interest.
Data Upload Summary Tab
The Data Upload Summary tab displays an upload history graph for the date range selected. Choose a File Status (successful, successful with warning, rejected, deleted, load failure) to filter the upload files presented in the Transaction table. You can also filter the table by clicking a status in the pie chart. All possible upload file status results are shown below.

The screenshot below shows results of files uploaded through web-based transmission on 9/01/20 and demonstrates how selecting a column in the bar graph displays the status of each file in the Transaction table. The options Successful with Warning and Rejected are selected in the File Status filter.
Selecting a file in the Transaction table (see blue highlight) populates the Error and Warning Detail tab with information about the selected file.
Click on the image to see a larger view.

Errors and Warning Detail Tab
Selecting a file or a facility ID in the Transaction Table in the Data Upload Summary tab, displays details about the Error Type and Error Detail as shown in the screenshot below.

Click on the image to see a larger view.
Note: Details about reports for rejected files submitted via the upload portal will not appear in the vast majority of cases. Most often this is due to an error that prevents the file from processing and logging errors, e.g., a name doesn’t follow specifications.
Did you find it helpful?
Yes
No
Send feedback Sorry we couldn't be helpful. Help us improve this article with your feedback.


